Thursday, August 30, 2012

Inspiration...

As quilters we are attracted, well maybe that's not a strong enough word, addicted to fabric! We go into a fabric store and we begin drooling over all the lovely new fabric lines! Or maybe it's just me, but I don't think so! But where do you find your inspiration for your next project? Is it from the person your making your project for? A certain color or pattern of fabric? Where ever we get our inspiration from it seems that once you get into a project, it kind of takes on a life of it's own. I mean it's one thing when you choose a kited project, but when you get to choose the colors and values, it opens other possibilities.

I guess that's the thing that fascinates me about being a new quilter. I choose fabrics and I love them, but when they get placed around the quilt top the transformation is amazing. At times it's easy to get overwhelmed by the choices and the complexities of the quilt, but taking it one block at a time makes all the difference. Now that I have made some quilts I have a new appreciation for all the work, love, and sometimes frustration that goes into making it. I often times think others just have no idea!! They look in wonder, but they just 'don't get it'!

We've been doing a lot of fall themes around my house lately and the wonderful fall lines that have been in the store have really gotten my creative juices going! I just can't wait for the pumpkin patch trip and getting all my fall stuff out! I think any of these combos would make a great throw and/or table topper to compliment my decor!

We also have some new lovely fabrics in from a line called 'Little Black Dress' and boy could I go to town with that as well!

But right now I've got say the Halloween fabric has really caught my eye! Even though it's not my most favorite holiday. There are those in my life that just love it! And I have to admit I do like the 'nice' Halloween decorations. But I have a girl friend who just needs the table topper made with our new 'Cat, Bats, & Bones' fabric! So I'll probably have to make it for her!

Where do you get your inspiration? Drop us a comment and share. Don't forget to 'follow us' to get the most current blog posts. There's a rumor that when we hit our first 100 followers we'll be doing a give-a-way! So stay tuned!

Have a wonderful day! And may your bobbins always be full!

Wednesday, August 29, 2012

Borders! Borders! Borders!

Borders, they are one of those things that can add so much or take away from a quilt. They seem so easy and yet there is a trick to them. You might think you can just cut your fabric to appropriate width and length, then just sew it on, right? Not so fast! If you want a square quilt that lays nicely, you may not want to use that method.

Each time you add a new piece of fabric to your quilt, no matter whether it's your first block or the middle of your quilt, you need to treat it as adding fabric to another block. In essence your 'quilt middle' is just one large quilt block. So here are some tips on how to go about it.

1. Measure! Measure! Measure!
The first thing you need to do is measure your quilt. Be sure to measure the top, middle and bottom of your quilt on the longest side. If your quilt is a square, just choose a side. Which side isn't as important.


2. Take the Average...
Now that I have the three measurements take the average. So add them up and divide by three to get the average length of the one side of your quilt. Then you cut your strip the length of that average. For example, say your quilt measures 34 + 34.25 + 34.5 = 102.75. Then you divide 102.75 by 3 and get 34.25, that's what you would cut your border. 

3. Pin from the Middle...
Once you have your fabric cut to the proper length, place it on the side of your quilt you're adding to. Then  find the middle of the boarder and the middle of that side of your quilt. Begin pinning from the center out. You will repeat this process for each boarder you're adding. This will keep your quilt top nice and square, give your top a much nicer look, and make it much easier to quilt. Especially if you're sending it out to be quilted!


By doing this three step process, you'll ensure your borders are added while keeping your quilt as square as possible. Another benefit is your quilt won't be "doing the wave", as Annie says!


You can learn all these helpful tips and more by taking a Parish Academy Class. Stop by the shop or check us out online and see what's coming up!

Have a great day and may your bobbins always be full!

Monday, August 27, 2012

Holiday Projects...

Have you started your holiday sewing yet? In need of a new project for that special someone? We just got in this wonderful kit from Moda! I am so excited about it because it is gorgeous!! A small applique project and seems manageable for all skill levels. What I love about it is, since it is small you can get your feet wet with applique. If you haven't already. I just love the look of applique, don't you? The other great thing is, because it is small, it's portable. So you can do your stitching anywhere! If you're doing needle turn that is!

This table runner is so beautiful and since it's just a runner it should be a 'quicker' project. It would make a wonderful hostess gift for your host for the holidays or just for yourself! You could also give this cute little kit to your favorite quilter as well! The options are endless! I especially love the cute little bag it comes it. I just love little packages.

I enjoy having things to decorate my home that are for those in between times and I think this would make a perfect addition for in between Autumn and Christmas.

The kit includes the pattern and all the fabric for the quilt, applique and binding. So pop in the store for a visit   or check it out in our online store and get it coming right to your door!


Have a wonderful day and may your bobbins always be full!


Sunday, August 26, 2012

You CAN Quilt!

Have you ever walked into a quilt shop and just admired all the lovely projects displayed on the wall? All your creative juices are running and yet you feel overwhelmed by the number of possibilities? There are so many ladies out there just like you! However at the Parish, the ladies are there to help you. Our Parish Academy series is starting up again in September. Whether you're a newbie or an experienced quilter who needs to brush up on their skills, these informative classes can help!

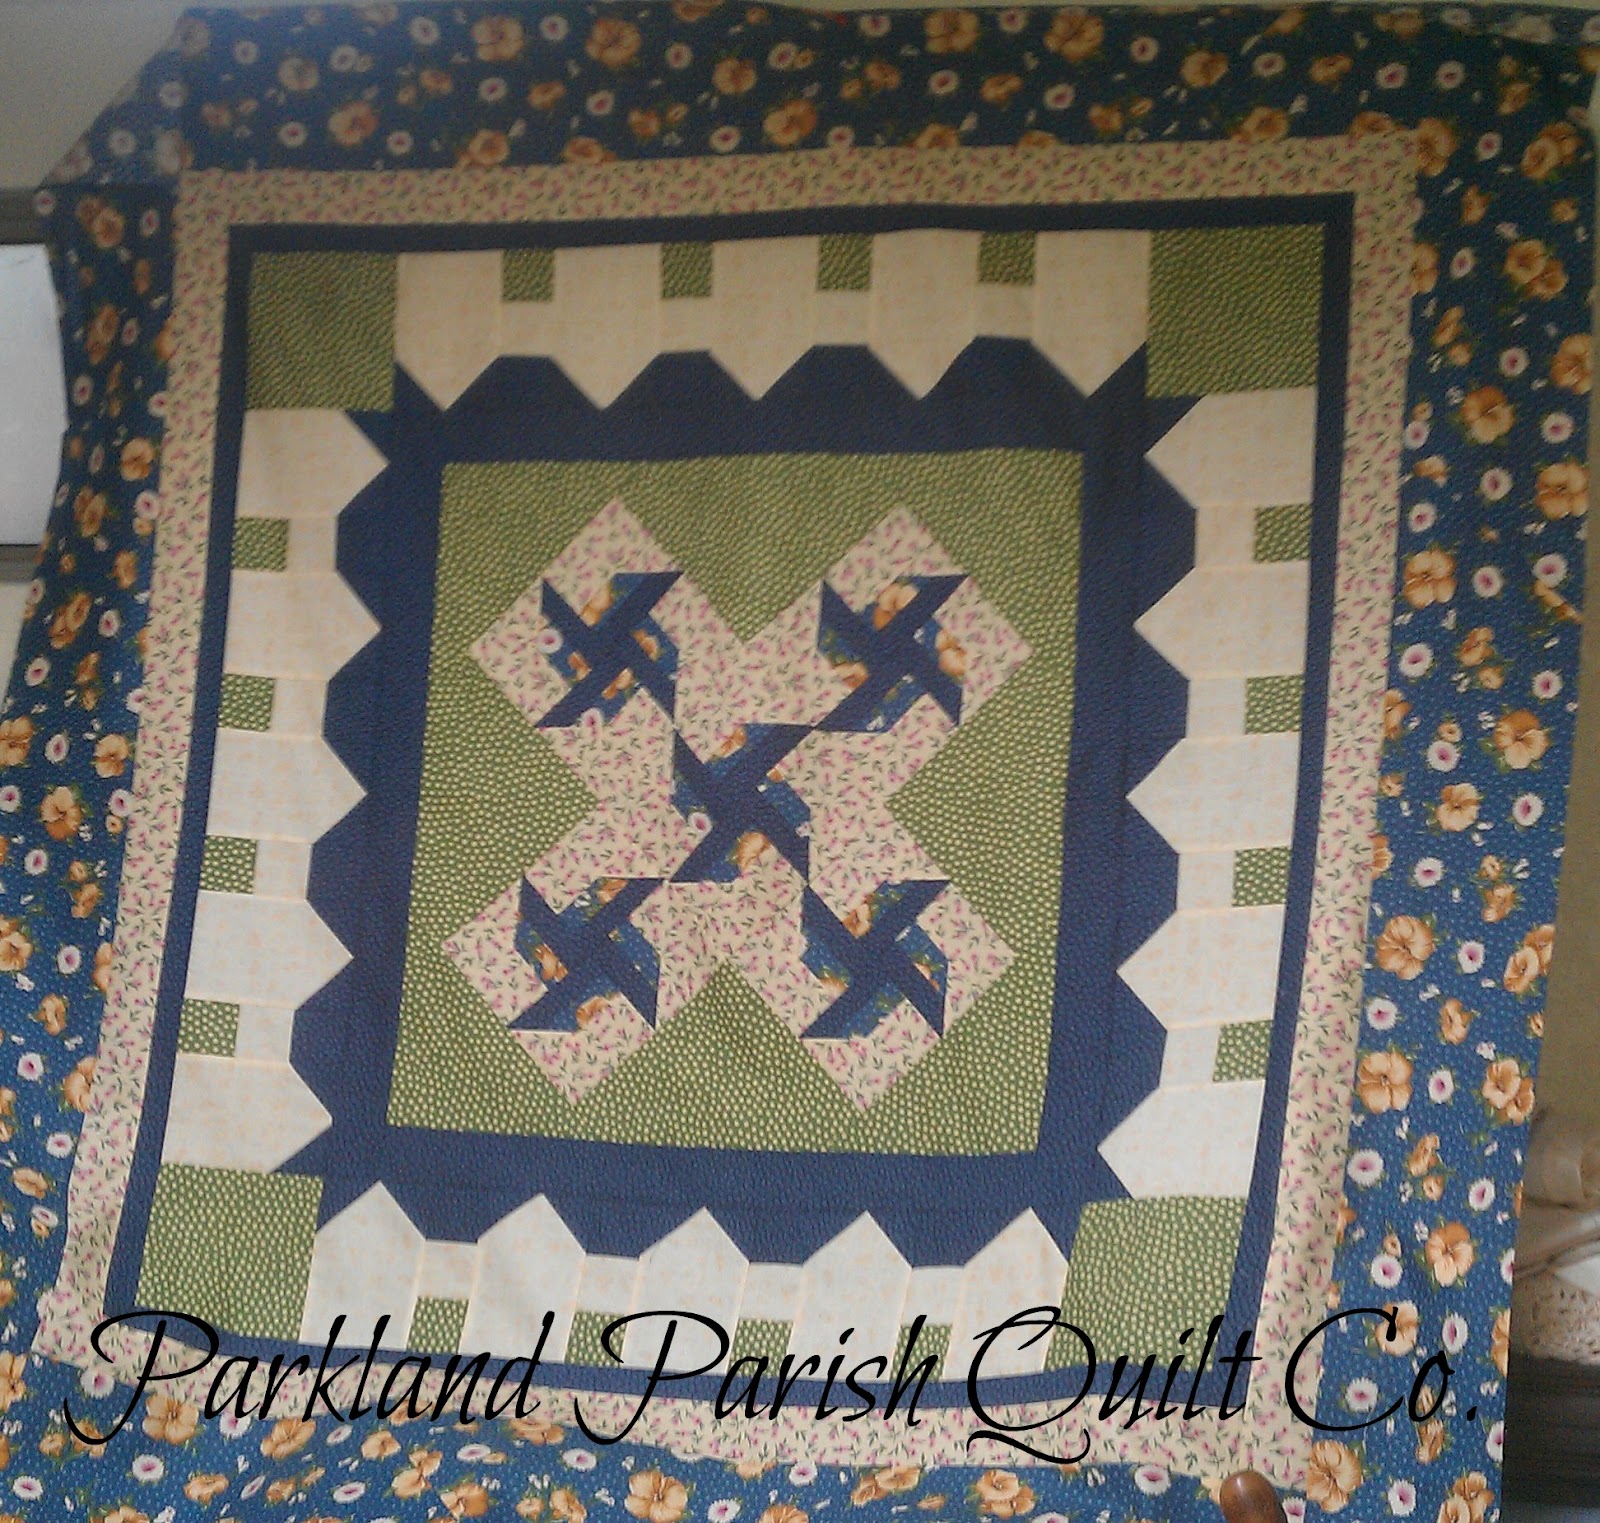
Here is a quilt done by one our by one of Parish Academy graduates. She's only been quilting since January 2012 and began with Spring Fling, the first of the Academy series. Look at the wonderful job she's done with this quilt top! She shared with us that she was, "completely intimidated by so many of the blocks in the quilts she'd seen," but now she's well on her way to creating up a storm!

This quilt is from our Thimbleberries Series. This class meets each month with a fun project and a sweet treat.

We are hoping to feature some of our customer and student quilts in upcoming posts! We're hoping that it will inspire you and if you've been dreaming of quilting 'some day', maybe you'll find the confidence to give it a try! So stay tuned to your Parish Piece to see what your fellow quilters have been up too!

Have a wonderful day and many your bobbins always be full!!

PS  Don't forget to become a follower so you don't miss a post! :)

Saturday, August 25, 2012

Taste of Autumn...


Autumn is just around the corner and you can begin to feel that nip in the air. Our days are getting shorter and kids will heading back to the class room. Every where you look you can see the signs. Apples are falling from the trees and black berries are ripening everywhere. That being the case we thought we'd share a lovely autumn dessert to grace your table.

Apple & Blackberry Cobbler
4 small/medium apples      2 cups of blackberries
2 Tbsp instant tapioca        2 Tbsp sugar
1 Tbsp melted butter
 
Shortcake Topping
1 1/2 cups all-purpose flour                    2 tsp baking powder
1/4 cup packed brown sugar                   1/4 cup melted butter (4 Tbsp)
1/2 cup heavy cream
 
Preheat oven to 425. Grease a 3qt casserole and set aside. Peel and slice the apples and then place them in the casserole. After washing the berries place them in a medium/large mixing bowl and gentle toss with the sugar and tapioca. Pour the berries over the apples, then drizzle with melted butter. In another bowl whisk the dry ingredients together for the topping. When dry ingredients are evenly distributed add the cream and melted butter. Mix into a stiff dough. Spoon dough on the fruit in a 'cobbled' fashion. Bake at 425 for 25 minutes or until crust is golden brown. Enjoy!


Leave us a comment or stop in the shop and let us know how it turned out. In the event you need to make a new runner to grace your table to accompany this yummy dessert! We have some wonderful fall prints waiting for you! You can even shop from the convince of your own home! Click here to check out what's new! Dessert and shopping how can you beat that! Enjoy!

Tuesday, August 7, 2012

Banana Split Bites!


  INGREDIENTS:
- 24 – 1″ pieces from about 1/2 small pineapple
- 2 large bananas, sliced into 24 bite sized pieces
- 12 small to medium sized strawberries sliced in half
- 150g (5oz) good quality dark chocolate (I used 72%) (This is between 3/4 – 1C if using a cup measurement for chocolate chips)
- 2 tsp coconut oil
- Chopped nuts or coconut for rolling in (optional)

DIRECTIONS:
Chop fruit and assemble into stacks. Press a Popsicle stick or tooth pick through the fruit and freeze until solid.
Prepare a baking sheet with parchment paper, wax paper or a silicone mat. 
Melt the chocolate along with the coconut oil either in a double boiler or in the microwave using short intervals and stirring frequently to prevent burning. 
Once completely melted, remove the frozen fruit from the freezer. Dip the fruit in the chocolate, let the excess drip off for a minute and then place on the sheet to harden. 
If desired, dip the chocolate covered side immediately in chopped nuts or coconut before placing on the sheet to harden. 
Once the chocolate is completely hardened (you may need to place in the freezer for it to harden completely)
Remove from the sheet and place in an airtight container to store in the freezer until ready to serve.

Thursday, August 2, 2012

All kinds of new goodies at the Parish!

Check out all the new fun fabrics we got in especially Novelties and Christmas!
Sentiments
3 Sisters designed such a beautiful Christmas line this year it is unbelievable! Just wait til you see it because you will not be thinking " oh yes this would make a stunning Christmas Quilt" It will be more along the lines of, "What this is Christmas?". This fabric can be used in many different ways due to the fact its not just red and green, it has the added colors of blue, grey, and cream! Not only did we get the fabric line we also have a kit and honey-bun!
Click Here to see this elegant line!


Snow Day Batiks
For all of you Batik lovers out there we cannot wait to tell you about the fun new Christmas line made up of winter inspired Batiks! They are in the tones of blue, grey, cream, and white! It is awesome! All of us here cannot stop looking at the intricate designs embedded in the fabric! There are mittens, snowmen, and holly leaves! It is just too much fun to look at all the details! 
Click Here to view the rest of the line!
Joy
When you think of Joy you think happiness. When you think of happiness you think of fabric. When you think of fabric you are instantly reminded of all your fun projects you have yet to make or finish! So lets get ahead of the game and make a fun Christmas quilt that will bring the fun side of the holiday out! Joy is filled with the very bright colors! Red, Green, and a touch of Blue! 
Click Here to view the rest of the line!

Novelties 
Click here to view all the fun novelties we got in! There's Route 66, Vintage Cars, Football Stripe, and Apple Stripe!


Monday, July 23, 2012

Fun Fusible Teddy Bears!

With this dreary weather we have had for a summer in Washington, it has left us to keep the little ones entertained! Here is something you and your little ones could do! Fusible Teddy Bears, they have the ability to go anywhere! On T-shirts, Baby Quilts, Aprons, Really the list could go on forever!


Baby Quilts: Get a fun colored charm square pack and sew all those together it could be about 5 x 6 (squares) which would be a good size for any little one. Then once it is sewn together you can fuse a teddy bear to every other square! 

Aprons: For the amounts of baking we do when we have children there is a good chance we wear an apron to protect out clothes! But one day we will get the question - "Mommy can I have an apron just like you?" Of course how can we say no.. So once you pick out the perfect apron and the little one picks out the colors you could let them join in on the fun and let them place the teddy bear's where they would want them! Even though it is just a little task they will enjoy being a part of the "Process"!

T-Shirts: Now this would be a quick and easy "rainy day" project! Go to your local store  to pick up a pack of  T-Shirts  and use them to fuse on all the fun teddy bears! Not only could they place them on the shirt they could decorate them with glitter glue, markers, and ric-rac! It would be a fun birthday party idea or just a fun project to keep them entertained!

If you are interested in getting your own pack of teddy bears with fusible backing already on it give us a call and we would be more than happy to send you a pack!

(253) 531- 4309

Thursday, July 19, 2012

Summertime Projects!

There are just some days when you need something new and fun to do! Well here at the Parish we have a solution for that! Make a quick and easy apron! And believe us when we say "Quick and Easy" because this one most definitely is! Kate Spain recently came out with a line called "Serenade" which has a apron on a panel! All you have to do is cut it out and follow the instructions attached! 

If you feel the need to spice it up you can even make it reversible! Just find the length of the apron and get the approximate yardage that will work for you, trace it and viola! You will have a completely different apron on the other side!

Click here to view the whole line on our website and Click here to be directed to the "Life's A Hoot" Apron!

Another fun projects you can do is the Farm Fresh! It is a perfect wall hanging for your lovely home! You will be doing all kinds of hand applique and sewing to keep you occupied on those warm summer nights!
Come on in to the shop today and the kit is yours! Everything you will need to make the quilt top and pattern is in there! At the reasonable price of $179.95
Call us with any questions! (253) 531- 4309

Monday, July 9, 2012

Parish Recipe Of The Month!

Even though Independence Day has come and gone, Jell-O Firecrackers are a fun, quick, and easy dessert to make for any summertime BBQ or family functions! The kids could even join in on the process of making them! 

Ingredients
1-1/3 cups boiling water
1 pkg. (3oz) Jell-O Berry Blue flavoring
1 pkg. (3oz) Jell-O Cherry Flavoring
1 pkg. KNOX unflavored gelatine
1 cup Milk
3 Tbsp Sugar
1/2 Tsp Vanilla
20 Maraschino Cherry's (with stems, well drained, and patted dry) 

Instructions
Add 2/3 cup boiling water to berry gelatin mix in small bowl; stir 2 min. until completely dissolved. Repeat with cherry gelatin mix. Cool.
Meanwhile, sprinkle unflavored gelatine over 1/4 cup milk in medium bowl; let stand 5 min. Bring remaining milk to boil in saucepan. Remove from heat; stir in sugar and vanilla. Add to plain gelatine mixture; stir until gelatine is completely dissolved. Cool 10 min. 
Spoon berry gelatin into 20 (1-oz.) plastic shot glasses sprayed lightly with cooking spray, adding about 2 tsp. to each. Refrigerate 15 min. or until set but not firm. 
Top with unflavored gelatine mixture, adding about 2 tsp. to each cup. Refrigerate 10 min. Insert cherry, stem end up, into white gelatine layer in each cup. Refrigerate 2 min
Cover with cherry gelatin, adding about 2 tsp. to each cup. Refrigerate 2 hours or until firm. Remove from cups before serving.